Installation Instructions
Step 1: Make sure you have the tools you will need:

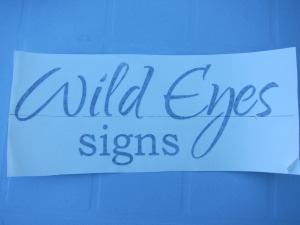
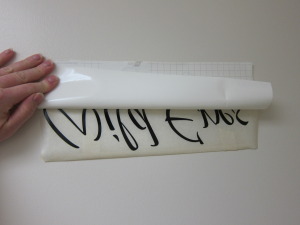
Step 2: Draw line on decal to help measure and level design
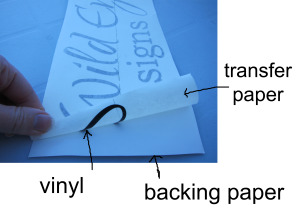
Step 3: Know the parts of the design:
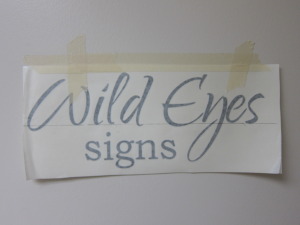
Step 4: Place design in space and use masking tape to hold. Use measuring tape and level to center image as you would like it to appear when finished using line as guide.

Step 5: Anchor well with tape across top of design (just short of length of design)…at this point if you have a larger design that can be separated, you can cut up between design and install each section seperately, but will remain level and straight if you have anchored well.
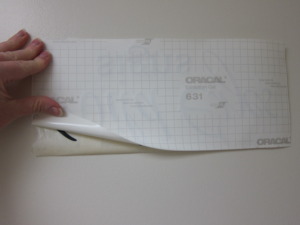
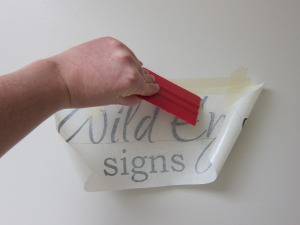
Step 6: Flip design up against wall and slowly pull backing paper off watching that vinyl stays stuck to transfer paper.
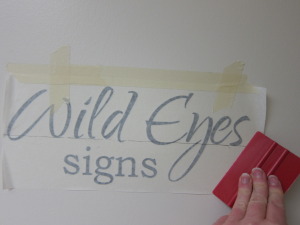
Step 7: Using straight edge work from top to bottom and then out in a “star” pattern pressing the design against the wall.

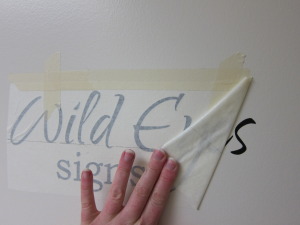
Step 8: Slowly remove transfer paper, pulling it back against itself. For larger designs you may wish to cut off sections as you remove them to make more manageable. Watch that the design does not come up with the paper-if this happens press the design firmly back against the wall and try again.
Step 9: You are finished! If you have multiple layers for your design, apply same way, using guides if provided.
Installation Instructions –
WHAT YOU RECEIVE:
Vinyl decal which is composed of 3 sections
1.Top layer is the transfer paper
2.The middle is your vinyl picture or verse
3.The bottom paper
WHAT YOU WILL NEED: Scissors, masking/painters tape, level, measuring tape/ruler, firm edge (credit card)
INSTALL: Remember with any type art, taking your time and patience is essential to ensure great installation. Try not to rush through things. For larger images you may wish to have a friend help you with installation. It is recommended that you install your image within 90 days of receipt.
Step 1- Decide where you are going to place your decal. Ensure your wall or surface is completely CLEAN and DRY to ensure proper adhesion. You should wait at least 3 weeks after your wall has been freshly painted to allow paint to cure before installing your image. Roll out your image and lay it out flat. You may wish to let your image sit out overnight to ease with the application process. Turn the image with transfer paper side down and using your firm edge press along image to help ensure the image sticks to the transfer paper.
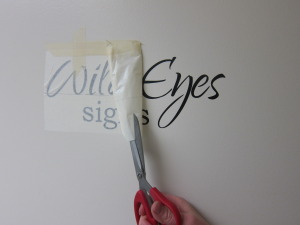
Step 2- If your decal comes in sections, use a scissor to separate sections. Using tape to hold image in place (do not separate layers of image at this point), tape up on wall so you can step back and see if you like the placement.Using a level and tape measure is great during this step to ensure that your image is centred and level. You may also wish to make a guideline by drawing a straight line with ruler across transfer paper to use when levelling image. If placing on wall use the ceiling and floor as your guide to centre image. The transfer paper and backing paper may not always be straight so ensure you measure from the decal or guideline. Step 3- Once the image is straight, place a long piece of masking tape along the top of the image.
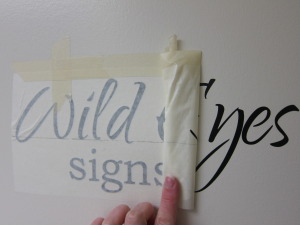
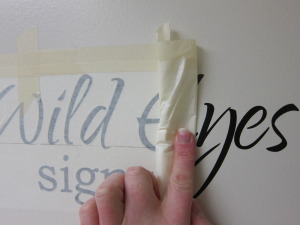
Step 4- Flip up the image and peel the backing paper off. The masking tape along the top will now act as a hinge. Carefully flip the image down, pulling down into place to ensure no wrinkles. Rub over the lettering with your firm edge working from the top down. Next work from the centre out to each side in a star pattern
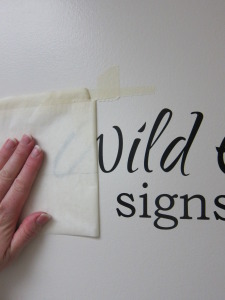
Step 5– Carefully peel the transfer paper away from the wall, keeping it flat against itself. This will keep pressure against the decal while the transfer paper is being removed.Occasionally the decal will come up with the transfer paper. If you find this happening, press it back to the wall and rub with your firm edge or help loosen the vinyl from the transfer paper and press firmly to the wall. Once the vinyl has been adhered, it cannot be repositioned.
Step 6- Congratulations you are finished.
[hr]
How do I Remove the Image?
The vinyl is easy to remove without damage to your wall. To remove, pull up a corner of each letter by using your fingernail or tweezers and gently SLOWLY pull off the lettering in a downward motion. If your wall image has been up for a longer period of time, you can soften it by using a hair dryer to make it easier to remove. If you notice any paint starting to come off with your letters, stop immediately and warm your decal with a blow dryer. Peel or curl the vinyl in a downward motion, rather than pulling it straight outward. If any sticky residue is left, use alcohol or a goo-gone product. Peel or curl the vinyl in a downward motion, rather than pulling straight outward. Please note upon removal slight damage may occur to the wall and slight touch up may be required.
Wild Eyes Signs will not be held responsible for damage to any paint or surface.
Our indoor vinyl is a 3-year film which removes cleanly and easily for up to 2 years after application and has a matte surface that suppresses unwanted reflection. It’s an ideal choice for temporary, short-term, and medium-term indoor graphics NOTE: Please keep out of reach of small children.
Not recommended for placement within reach of children under 3 years.